Ochestration
This tutorial provides step-by-step instructions for saving job results to the RESULTS table within a project. It also covers how to use tasks to orchestrate workloads between Snoweaver and your data pipelines.
For details on the REST API endpoints used in this tutorial, please refer to the following documentation pages:
Prerequisites
Before continuing with this tutorial, ensure you have completed the following prerequisites:
Create test accounts in Salesfoce with the upsert job
We’ll create 500 test accounts in our Salesforce sandbox for this tutorial, using the upsert job from the previous tutorial with the Snowflake sample database.
Open a Snowflake worksheet and execute the statements below with a role that has the required privileges. You may use the AccountAdmin role if working in a sandbox environment:
-- import the sample database
CREATE DATABASE IF NOT EXISTS SNOWFLAKE_SAMPLE_DATA FROM SHARE SFC_SAMPLES.SAMPLE_DATA;
GRANT IMPORTED PRIVILEGES ON DATABASE SNOWFLAKE_SAMPLE_DATA TO ROLE PUBLIC;

USE ROLE LEARN_DEV_DEVELOPER;
USE SCHEMA LEARN_SW.DEV;

-- set up the source table for test accounts
CREATE OR REPLACE TABLE TPCH_UPSERTED_ACCOUNTS
AS
SELECT TOP 500
'Account' AS OBJECT,
'customExtIdField__c' AS EXTERNAL_ID_FIELD,
TO_VARCHAR(C_CUSTKEY) as EXTERNAL_ID,
OBJECT_CONSTRUCT('Name',C_NAME ,'Type','New Customer') as RECORD
FROM SNOWFLAKE_SAMPLE_DATA.TPCH_SF1.CUSTOMER
ORDER BY C_CUSTKEY;
Run the following statement to create the test accounts. This process will take approximately 1 minute.
CREATE OR REPLACE TABLE TPCH_UPSERTED_ACCOUNTS_WITH_SFDC_ID
AS
SELECT
EXTERNAL_ID,
RECORD:Name::VARCHAR AS NAME,
SNOWEAVER.LEARN_DEV.SFDC_UPSERT_OBJECT_RECORD(
   OBJECT,EXTERNAL_ID_FIELD,EXTERNAL_ID,RECORD
):id::VARCHAR as SFDC_ID
FROM TPCH_UPSERTED_ACCOUNTS;

SELECT * FROM TPCH_UPSERTED_ACCOUNTS_WITH_SFDC_ID;
Note
We use this method to generate only a small number of accounts. For creating a large volume of records, bulk ingestion is recommended.Please refer to Tutorial: Upload data using a multipart web request job for more details.
Import the sfdc_lib macro library
Note
If you’ve already imported the sfdc_lib macro library from previous tutorials, you can skip this section.
Open the LEARN_DEV project in Snoweaver with the LEARN_DEV_DEVELOPER role.
Open the Home page.
Use the Importing / Exporting Resources function to import the the following library.
Format: On Screen
Resource Type: Macro Lib
New record: checked
Name: sfdc_lib
YAML Resource Data:
macros: |-
   {%- macro get_job_info(response,interval,iterations) -%}
      {%- for i in range (iterations) -%}
            {%-  set result=call_proc('sfdc_get_job_info',response) -%}
            {%-  set result_dict=json_loads(result) -%}
            {%- if result_dict.state in  ['JobComplete']  -%}
               {{ result }}
               {%- break -%}
            {%- elif result_dict.state in  ['Aborted','Failed'] -%}
               {{ raise_exception(result_dict['errorMessage']) }}
            {%- endif -%}
            {{- sleep(interval) -}}
            {%- if loop.last -%}
               {{- raise_exception('The job did not complete within the specified time limit.') -}}
            {%- endif -%}
      {%- endfor -%}
   {%- endmacro -%}

   {%- macro check_error(status, response) -%}
      {%- if not( 200 <= status <= 299) -%}
         {{ raise_exception(response[0]['message']) }}
      {%- endif -%}
   {%- endmacro -%}
Import jobs for executing SOQL queries
Open the LEARN_DEV project in Snoweaver with the LEARN_DEV_DEVELOPER role.
Open the Home page.
Use the Importing / Exporting Resources function to import the the following resources.
Format: On Screen
Resource Type: Job
New record: checked
Name: sfdc_query
YAML Resource Data:
endpoint: https://{{_proj.sfdc_account}}.my.salesforce.com/services/data/v61.0/queryAll?q={{_vars.query}}
external_integration: sfdc_learn_dev_access_integration
headers: |-
  {
        "Authorization":"Bearer {{_secrets.token}}",
        "Sforce-Query-Options": "batchSize={{_vars.batch_size}}"
  }
instance_type: procedure
macro_libs:
  - sfdc_lib
posthook: |-
  {{ check_error(_status,_response) }}
  {% if _vars.get_all and _response.nextRecordsUrl %}
      {% do call_proc('sfdc_query_next_batch', _response.nextRecordsUrl, _vars.scope, _vars.batch_size) %}
  {% endif %}
request_type: get
response_format: json
save_results_scope: '{{_vars.scope}}'
secrets:
  - alias: token
    secret: sfdc_learn_dev_oauth_access_token
type: web_request
variables:
  - name: query
    type: text
    value: select customExtIdField__c,Fields(standard) from account
  - name: scope
    type: text
    value: sfdc_accounts
  - name: batch_size
    type: number
    value: '200'
  - name: get_all
    type: boolean
    value: 'True'
Format: On Screen
Resource Type: Job
New record: checked
Name: sfdc_query_next_batch
YAML Resource Data:
endpoint: https://{{_proj.sfdc_account}}.my.salesforce.com{{_vars.next_batch_url}}
external_integration: sfdc_learn_dev_access_integration
headers: |-
  {
        "Authorization":"Bearer {{_secrets.token}}",
        "Sforce-Query-Options": "batchSize={{_vars.batch_size}}"
  }
instance_type: procedure
macro_libs:
  - sfdc_lib
posthook: |-
  {{ check_error(_status,_response) }}
  {%- set vars = _vars.copy() %}
  {%- if _response.nextRecordsUrl %}
      {% do vars.update({'next_batch_url': _response.nextRecordsUrl}) %}
      {% do call_proc('sfdc_query_next_batch', *vars.values()) %}
  {%- endif %}
request_type: get
response_format: json
save_results_scope: '{{_vars.scope}}'
secrets:
  - alias: token
    secret: sfdc_learn_dev_oauth_access_token
type: web_request
variables:
  - name: next_batch_url
    type: text
    value: /services/data/v61.0/query/0r8xx3L935PXsn0ACD-200
  - name: scope
    type: text
    value: sfdc_accounts
  - name: batch_size
    type: number
    value: '200'
Review and test the query job
Open sfdc_query on the Jobs page.
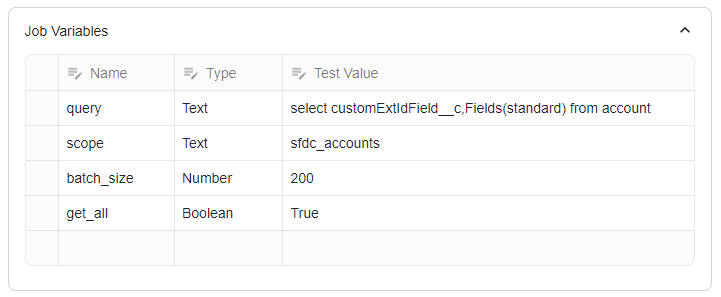
The following variables are defined for the job.
query: the SOQL query statement. In this tutorial, we will query for all standard fields and the external ID field of accounts that have been updated since the most recent extraction.
scope: The scope label associated with the results of the job runs
batch_size: The number of records to retrieve per batch. By default, this value is set to 2000. For the purposes of this tutorial, we will adjust it to 200 to ensure that we can process the results in multiple batches.
get_all: A boolean indicating whether to retrieve all data (True) or just a single batch (False).
Review and test the Jinja template for specifying the job endpoint URL.
Review and test the Jinja template for specifying the job headers. A new header has been added to this job to specify the batch size. This value is dynamically derived from the associated variable.
The Save Job Results option is now enabled, with its value sourced from the scope variable.
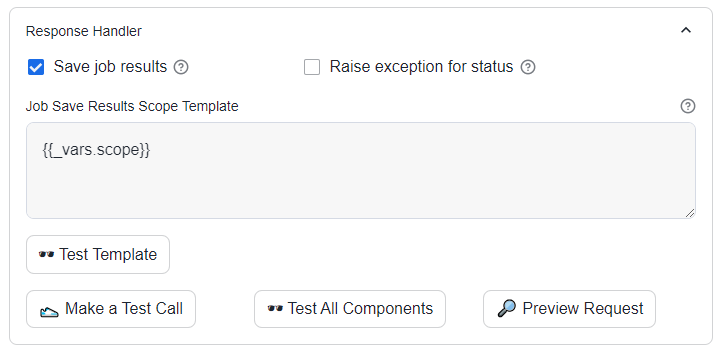
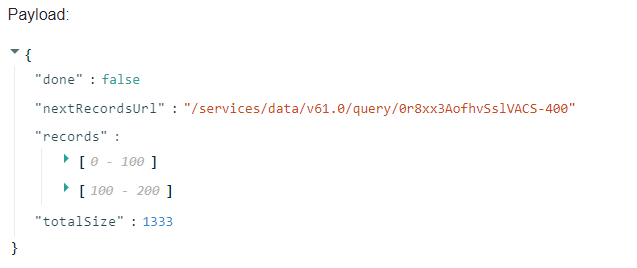
Click Make a Test Call to retrieve the initial batch of data from Salesforce. Since no specific condition was set for the query variable’s test value, this batch will include the accounts created during the initial deployment of the sandbox.
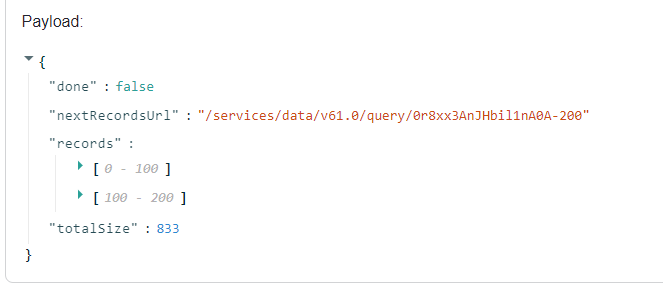
Copy nextRecordsUrl from the payload for future reference.
Review and test the query next batch job
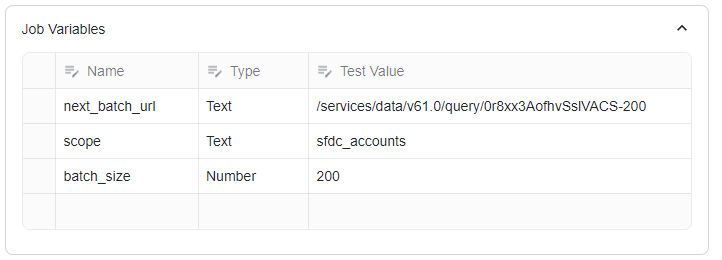
Open the job sfdc_query_next_batch, designed to return the next batch of results using the next_batch_url variable.
Update the test value of next_batch_url with the newly copied value
Click Make a Test Call to test the job and fetch the next batch of data from Salesforce.
Click Build to build a new instance.
Review the post-hook section, which performs the following tasks:
Uses the check_error macro to determine if the response contains any errors.
Handles pagination. If nextRecordsUrl is present in the response:
The job updates the next_batch_url variable with the new URL.
It then calls itself recursively with the updated parameters.
This process continues until nextRecordsUrl is no longer present in the response, indicating that all data has been retrieved.
Click Test Template to test the post-hook. The expected output is an empty string.
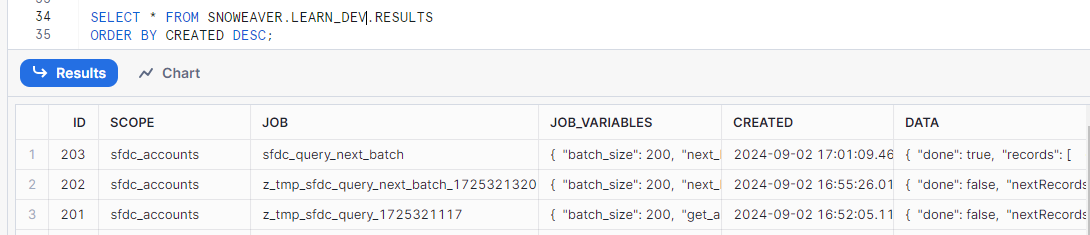
Return to the Snowflake worksheet and query the RESULTS table in LEARN_DEV.
USE ROLE LEARN_DEV_DEVELOPER;
SELECT * FROM SNOWEAVER.LEARN_DEV.RESULTS
ORDER BY CREATED DESC;
The results of the test calls have been saved in this table, with each entry tagged with the scope label.
Truncate this table to start a fresh run of the query job.
TRUNCATE TABLE SNOWEAVER.LEARN_DEV.RESULTS;
Test the post-hook for the query job
Open sfdc_query on the Jobs page.
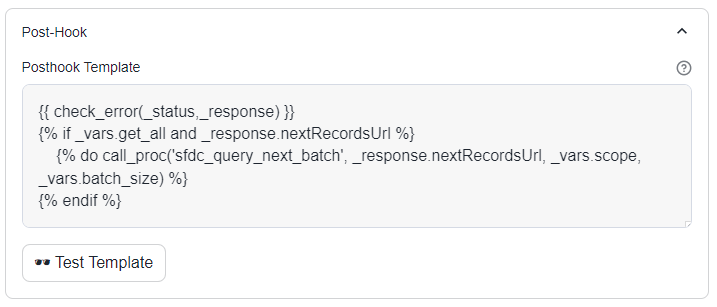
Navigate to the Post-hook section and review the configuration.
The post-hook performs the following tasks:
Uses the check_error macro to determine if the response contains any errors.
If get_all is True and nextRecordsUrl is present in the response:
Calls the sfdc_query_next_batch procedure with the nextRecordsUrl.
Passes along the same scope and batch_size variables to maintain consistency.
Click Make a Test Call with Posthook to initiate a test call with the post-hook.
Click Build to build a job instance.
Create tasks for extracting and loading account change history
Return to the Snowflake worksheet.
Execute the following statements to create a view with a stream for the sfdc_accounts scope.
USE ROLE LEARN_DEV_DEVELOPER;
USE SCHEMA LEARN_SW.DEV;

-- Create a view to filter Salesforce account results
CREATE OR REPLACE VIEW V_SFDC_ACCOUNT_CHANGE_QUERY_RESULTS AS
SELECT *
FROM SNOWEAVER.LEARN_DEV.RESULTS
WHERE SCOPE = 'sfdc_accounts';

-- Create a stream to capture changes in the view
CREATE OR REPLACE STREAM STREAM_SFDC_ACCOUNT_CHANGE_QUERY_RESULTS
ON VIEW V_SFDC_ACCOUNT_CHANGE_QUERY_RESULTS
APPEND_ONLY = TRUE
SHOW_INITIAL_ROWS = TRUE;

-- Display the initial contents of the stream
SELECT * FROM STREAM_SFDC_ACCOUNT_CHANGE_QUERY_RESULTS;
Create a table to store the history of account changes.
CREATE OR REPLACE TABLE LEARN_SW.DEV.SFDC_ACCOUNT_CHANGE_HISTORY (
   CHANGE_ID NUMBER AUTOINCREMENT,
   SFDC_ID VARCHAR,
   TPCH_ID VARCHAR,
   IS_DELETED BOOLEAN,
   NAME VARCHAR,
   SYSTEM_MOD_STAMP TIMESTAMP_LTZ,
   DATA VARIANT
);
Create a task to extract the change history from Salesforce by calling the SFDC_QUERY job.
CREATE TASK SFDC_EXTRACT_ACCOUNT_CHANGE_HISTORY
WAREHOUSE=LEARN_SW_WH
AS
BEGIN
   -- Create a WHERE clause to verify the high-water mark condition if the target table contains data
   LET WHERE_CLAUSE VARCHAR := NVL(
      ' WHERE SYSTEMMODSTAMP > ' ||
      TO_VARCHAR(
         (SELECT MAX(SYSTEM_MOD_STAMP)::TIMESTAMP
          FROM SFDC_ACCOUNT_CHANGE_HISTORY),
         'YYYY-MM-DD"T"HH24:MI:SS.FF3TZHTZM'
      ),
      ''
   );
   -- Assemble the query
   LET QUERY VARCHAR := 'SELECT ID, NAME, ISDELETED, SYSTEMMODSTAMP, customExtIdField__c FROM ACCOUNT' || WHERE_CLAUSE;
   -- Call sfdc_query
   CALL SNOWEAVER.LEARN_DEV.SFDC_QUERY(:QUERY, 'sfdc_accounts', 200, TRUE);
   RETURN 'Task successfully completed.';
END;
Create another task to load the new records from the stream to the change history table.
CREATE OR REPLACE TASK SFDC_LOAD_ACCOUNT_CHANGE_HISTORY
WAREHOUSE = LEARN_SW_WH
AS
INSERT INTO SFDC_ACCOUNT_CHANGE_HISTORY
(SFDC_ID, TPCH_ID, IS_DELETED, NAME, SYSTEM_MOD_STAMP, DATA)
SELECT
   R.VALUE:Id::VARCHAR AS SFDC_ID,
   R.VALUE:customExtIdField__c::VARCHAR AS TPCH_ID,
   R.VALUE:IsDeleted::BOOLEAN AS IS_DELETED,
   R.VALUE:Name::VARCHAR AS NAME,
   TRY_TO_TIMESTAMP_LTZ(R.VALUE:SystemModstamp::VARCHAR, 'YYYY-MM-DD"T"HH24:MI:SS.FF3TZHTZM') AS SYSTEM_MOD_STAMP,
   R.VALUE AS DATA
FROM STREAM_SFDC_ACCOUNT_CHANGE_QUERY_RESULTS SQR,
LATERAL FLATTEN(input => SQR.DATA:records) R
WHERE R.VALUE IS NOT NULL;
Perform a one-time execution of the load task to clear the stream data generated by the test call for sfdc_query.
EXECUTE TASK SFDC_LOAD_ACCOUNT_CHANGE_HISTORY;
Wait for 10 seconds, or monitor the run history of the task. Afterward, examine the results in the history table.
-- Check the contents of the SFDC_ACCOUNT_CHANGE_HISTORY table
SELECT * FROM SFDC_ACCOUNT_CHANGE_HISTORY;

-- Verify that the stream data has been cleared
SELECT * FROM STREAM_SFDC_ACCOUNT_CHANGE_QUERY_RESULTS;
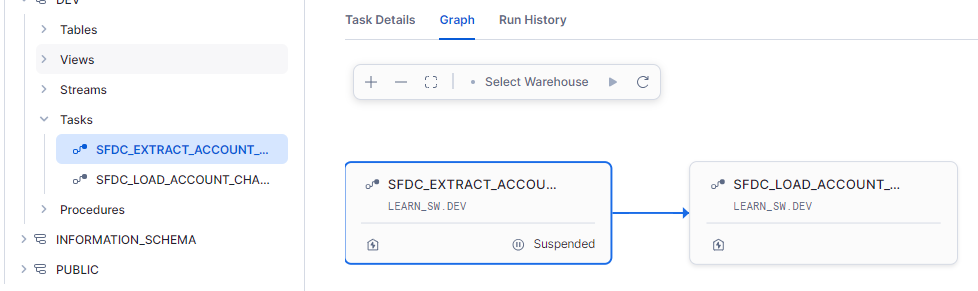
Let’s integrate the two tasks we created.
-- Place the load task to run after the extract task
ALTER TASK SFDC_LOAD_ACCOUNT_CHANGE_HISTORY ADD AFTER SFDC_EXTRACT_ACCOUNT_CHANGE_HISTORY;

-- Resume the load task to enable its execution
ALTER TASK SFDC_LOAD_ACCOUNT_CHANGE_HISTORY RESUME;
Let’s delete several test accounts using the delete job, which will ensure we have changes for the incremental run.
SELECT
  TUA.EXTERNAL_ID,
  TUA.NAME,
  SDO.*
FROM (
  SELECT TOP 3 *
  FROM TPCH_UPSERTED_ACCOUNTS_WITH_SFDC_ID
) AS TUA
CROSS JOIN TABLE(SNOWEAVER.LEARN_DEV.SFDC_DELETE_OBJECT_RECORD('Account', TUA.SFDC_ID)) AS SDO;

Initiate the pipeline by executing the extract task.
EXECUTE TASK SFDC_EXTRACT_ACCOUNT_CHANGE_HISTORY;
Monitor the execution history of the secondary load task and ensure it completes before proceeding.
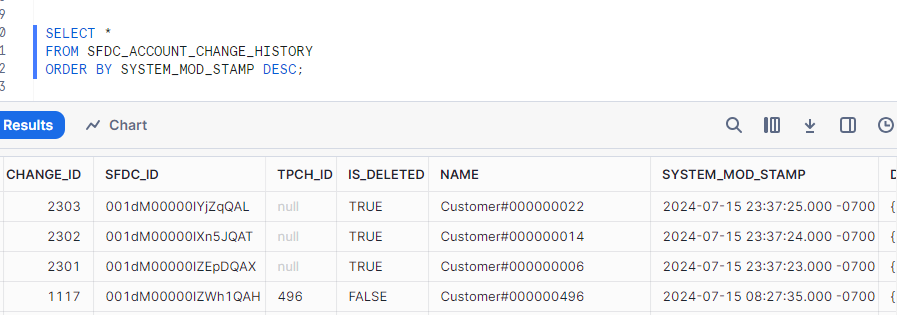
Query the history table to confirm the changes.
SELECT *
FROM SFDC_ACCOUNT_CHANGE_HISTORY
ORDER BY SYSTEM_MOD_STAMP DESC;
Lastly, we delete all test accounts and then extract and load the changes.
-- Delete all test accounts
SELECT
  TUA.EXTERNAL_ID,
  TUA.NAME,
  SDO.*
FROM TPCH_UPSERTED_ACCOUNTS_WITH_SFDC_ID AS TUA
CROSS JOIN TABLE(SNOWEAVER.LEARN_DEV.SFDC_DELETE_OBJECT_RECORD('Account', TUA.SFDC_ID)) AS SDO;

-- Execute the extract task
EXECUTE TASK SFDC_EXTRACT_ACCOUNT_CHANGE_HISTORY;

-- Wait for the load task to complete
-- Query the change history to confirm deletions
SELECT *
FROM SFDC_ACCOUNT_CHANGE_HISTORY
ORDER BY SYSTEM_MOD_STAMP DESC;